ONLINE ONBOARDING
Step-by-step tutorials to help you get started with OCLite faster.
Step 1: Global Configuration
Step 2: HRMS
1. HRMS Configurations – Manage Department
2. HRMS Configurations – Manage Designation
3. HRMS Configurations – Manage Job Classifications
4. Staff Management – How to Add New Staff?
5. Staff Management – How to Edit Staff’s Information?
6. Leave Setup – Step 1: Define Leave Types
7. Leave Setup – Step 2: Leave Entitlement Defaults
Step 3: Payroll
Step 4: Accounting
1. Accounting Configurations – Wizards
2. Accounting Configurations – Accounting Period
3. Understanding Chart of Accounts
4. How to Create and Manage Customer (Debtor)
5. How to Create and Manage Invoice
6. How to Create and Manage Receipt (Receive Payment)
7. How to Create and Manage Credit Note
8. How to Create and Manage Debit Note
9. How to Create and Manage Supplier (Creditor)
10. How to Create and Manage Receive Invoice
11. How to Create and Manage Self-Billed Invoice
12. How to Create and Manage Payment (Issue Payment / Payment Voucher)
13. How to Create and Manage Received Credit Note
Step 5: Pricebook
Step 6: CRM
Step 7: POS
Step 8: System Enhancements (Optional)
Global Configuration
1. How Do I Change My Username, Email, or Password?
2. How to Set Reports Template?
4. What Should I Do If I Forgot My Password?
HRMS
1. HRMS Configurations – Manage Approvers
2. Staff Management – Resign, Deactivate, Suspend & Unassign
PAYROLL
1. Manage Adjustments – Adjustment Purposes
2. Manage Adjustments – Add Adjustment Individually
CRM
1. Contact Book Overview (Leads, Accounts and Contacts)
3. Financial Transactions Overview
ACCOUNTING
Step 9: OC Lite Beginner Certification
Complete all onboarding modules to unlock and download your Beginner Digital Certificate.
Process and Manage Salary Slips
? Where to Access Payroll
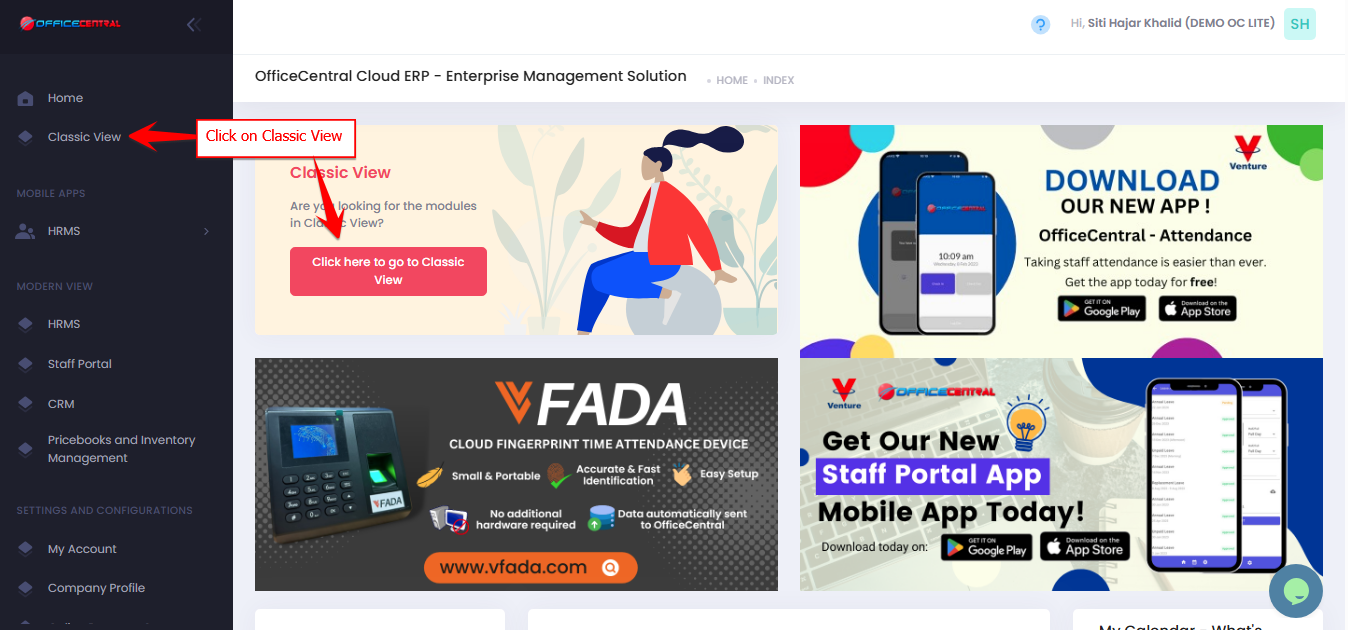

▶️ Step 1: Start Salary Processing
Click the PROCESS button to begin generating salary slips.
Use the screenshot below to locate the button

? Step 2: Fill in Payroll Information
Enter the required details for the salary calculation.
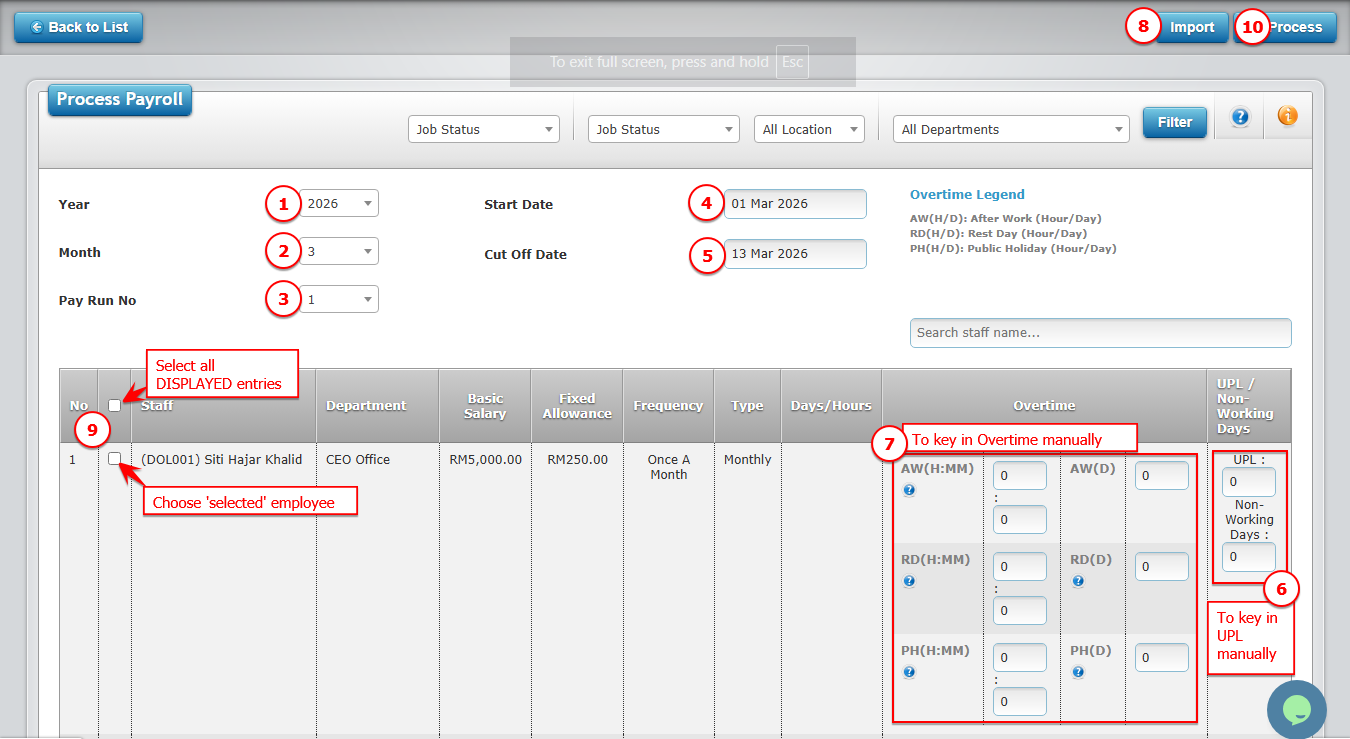
Please refer to the explanation below to help you complete the fields correctly.
| No. | Field | What to Enter |
|---|---|---|
| 1 | Year | Select the payroll year |
| 2 | Month | Select the payroll month |
| 3 | Pay Run Number | Choose the salary payment cycle (e.g., Pay Run 1 or Pay Run 2) |
| 4 | Start Date | Enter the start date for the payroll period |
| 5 | End Date | Enter the end date for the payroll period |
| 6 | Unpaid Leave Days | Enter total unpaid leave days for the staff (if any) |
| 7 | Overtime | Enter overtime details if applicable |
| 8 | Import | To import Unpaid Leave Days and Overtime from HRMS. Refer explanation below |
| 9 | Select entry(s) | Button for Step 3 |
| 10 | Process | Button for Step 4 |
Step 2a: Import Unpaid Leave and Overtime from HRMS (Field No. 8)
Please refer picture below the steps to import unpaid leave and overtime
⚠️ Important Notes Unpaid Leave
| Situation | What Happens |
|---|---|
|
Payroll Group setting: Select unpaid leave deduction calculation type when salary changes between cut-off date. (Monthly only!):
1. Based on salary on the leave date. (Only take leaves in the HRMS Leave Application module) |
System ONLY ACCEPT imported unpaid leave from HRMS Leave Application. The value cannot be edited manually. |
|
Payroll Group setting: Select unpaid leave deduction calculation type when salary changes between cut-off date. (Monthly only!):
1. Default (Based on latest salary between cut-off date) 2. Based on average salary between cut-off date |
You may import OR edit unpaid leave days manually if required. |
| After importing unpaid leave | The value cannot be edited to maintain data accuracy. |
⚠️ Important Notes Overtime
| Rule | Explanation |
|---|---|
| Overtime rate | Calculated based on the Payroll Group settings |
| Imported overtime | Cannot be edited after import |
| If no import | Admin can manually key in overtime if required |
? Step 3: Select Staff
Tick √ next to the staff name(s) whose salary you want to process.
⚙️ Step 4: Process Salary
Click the PROCESS button on the right side of the page.
? If you are processing payroll for many staff, the system may take a few moments to complete.
After processing salary slips
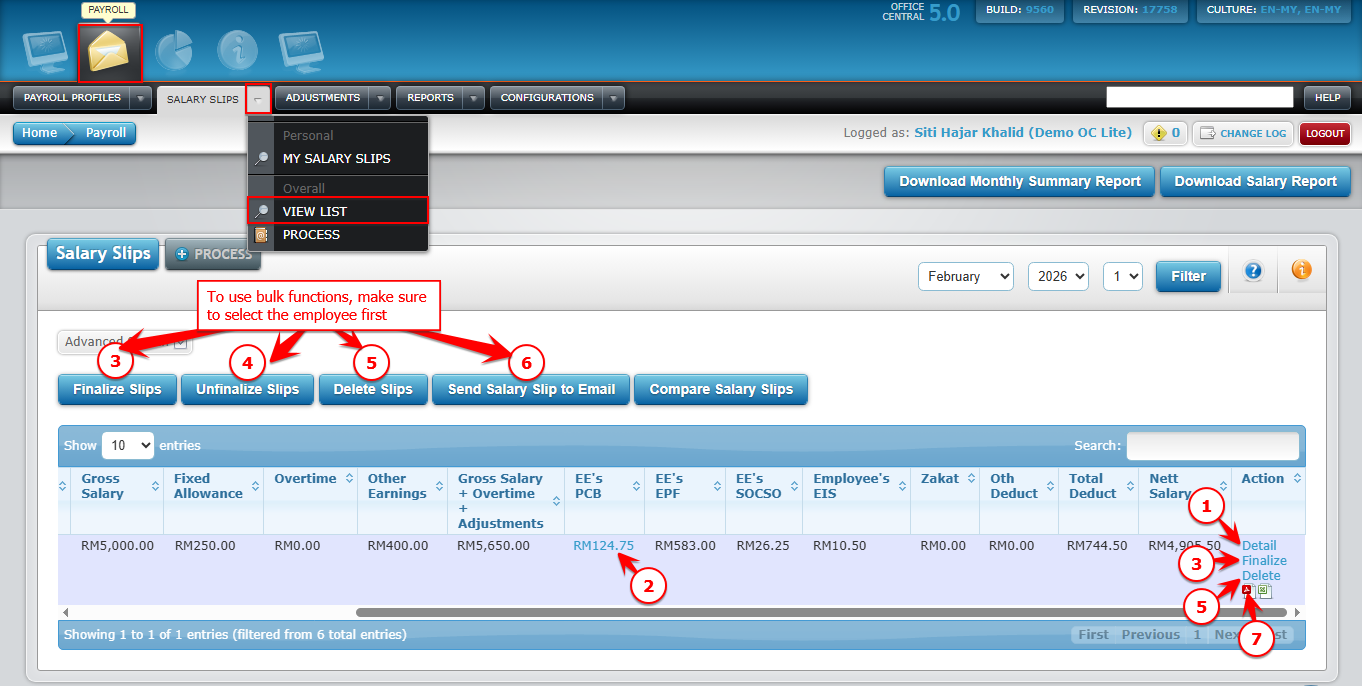
Once salary slips are processed, you can manage them using the options on the View List (Overall) page.
| No. | Button | Function | Important notes |
|---|---|---|---|
| 1 | Detail | View salary slip details for an individual staff | Shows all components like gross salary, deductions, net salary, unpaid leave, overtime, etc. |
| 2 | View PCB details | View staff’s PCB/MTD tax details | For tax verification purposes. |
| 3 | Finalize slips | Finalize salary slips in bulk | Once finalized, salary slips cannot be edited. Finalizing is required if you want staff to view their salary slip. |
| 4 | Unfinalize slips | Unlock finalized salary slips in bulk | Only use if you need to make adjustments before re-finalizing. |
| 5 | Delete | Delete salary slips in bulk | Only delete if you need to reprocess payroll. |
| 6 | Send salary slip to email | Send salary slip copy to staff via email | Charges apply to OC Credit. Make sure the account has sufficient OC Credit before sending. |
| 7 | Download individually | Download salary slip for a specific staff | PDF format (staff with access) and Excel/PDF for admin. |
Use the screenshot below to locate each button