
ONLINE ONBOARDING
Step-by-step tutorials to help you get started with OCLite faster.
Step 1: Global Configuration
Step 2: HRMS
1. HRMS Configurations – Manage Department
2. HRMS Configurations – Manage Designation
3. HRMS Configurations – Manage Job Classifications
4. Staff Management – How to Add New Staff?
5. Staff Management – How to Edit Staff’s Information?
6. Leave Setup – Step 1: Define Leave Types
7. Leave Setup – Step 2: Leave Entitlement Defaults
Step 3: Payroll
Step 4: Accounting
1. Accounting Configurations – Wizards
2. Accounting Configurations – Accounting Period
3. Understanding Chart of Accounts
4. How to Create and Manage Customer (Debtor)
5. How to Create and Manage Invoice
6. How to Create and Manage Receipt (Receive Payment)
7. How to Create and Manage Credit Note
8. How to Create and Manage Debit Note
9. How to Create and Manage Supplier (Creditor)
10. How to Create and Manage Receive Invoice
11. How to Create and Manage Self-Billed Invoice
12. How to Create and Manage Payment (Issue Payment / Payment Voucher)
13. How to Create and Manage Received Credit Note
Step 5: Pricebook
Step 6: CRM
Step 7: POS
Step 8: System Enhancements (Optional)
Global Configuration
1. How Do I Change My Username, Email, or Password?
2. How to Set Reports Template?
4. What Should I Do If I Forgot My Password?
HRMS
1. HRMS Configurations – Manage Approvers
2. Staff Management – Resign, Deactivate, Suspend & Unassign
PAYROLL
1. Manage Adjustments – Adjustment Purposes
2. Manage Adjustments – Add Adjustment Individually
CRM
1. Contact Book Overview (Leads, Accounts and Contacts)
3. Financial Transactions Overview
ACCOUNTING
Step 9: OC Lite Beginner Certification
Complete all onboarding modules to unlock and download your Beginner Digital Certificate.
How to Manage Quotation
This guide explains how to create, edit, delete, and finalize quotations in CRM.
A Quotation is used to provide pricing details to customers before confirming a sale.
? Where to Access CRM
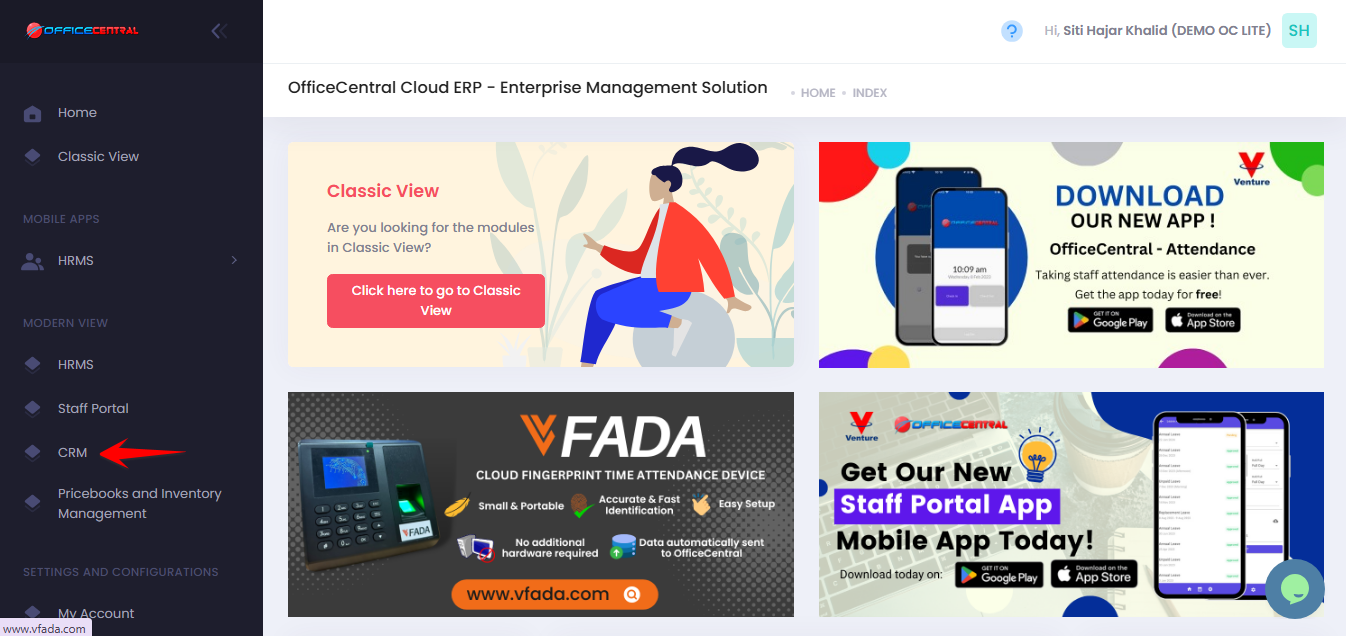
Where to Access This Function
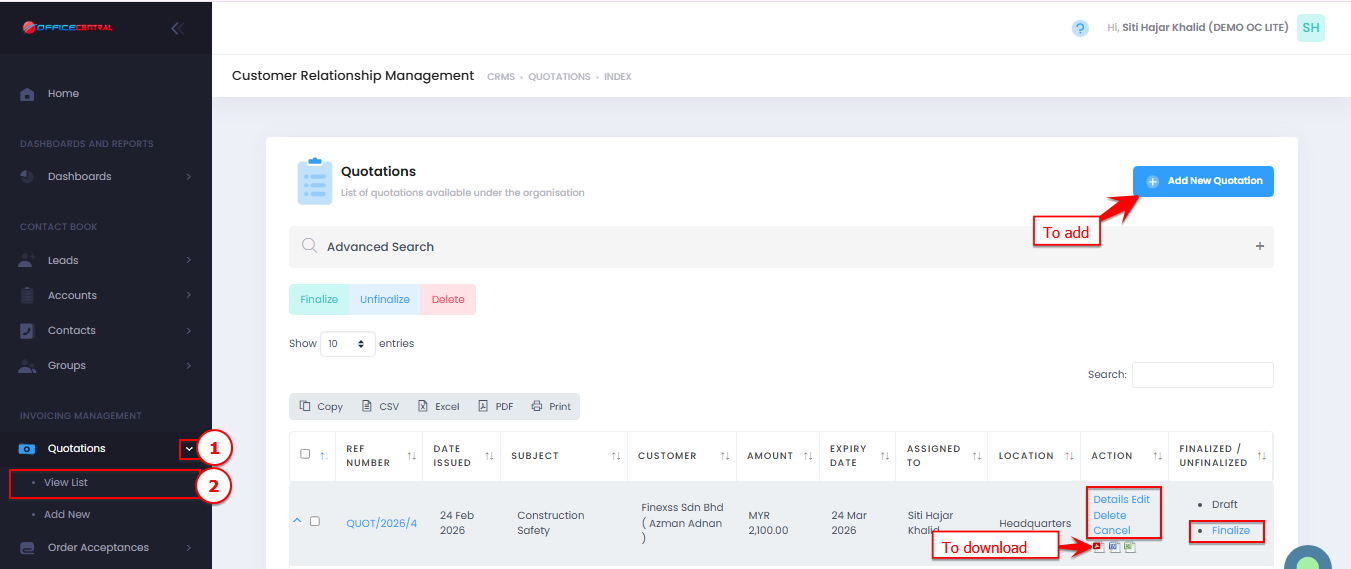
On the Quotations > View List page, you will see the following functions:
| No. | Function | Description |
|---|---|---|
| 1 | Add New Quotation | Create a new quotation |
| 2 | Edit | Modify an existing quotation |
| 3 | Delete | Remove a quotation |
| 4 | Details | View full quotation information |
| 5 | Finalize | Confirm the quotation (lock for editing, cannot delete) |
| 6 | Download | Download quotation in PDF / Excel / Words |
Use the screenshot below to locate these buttons.
Add New Quotation
-
Click Add New Quotation.
-
Fill in the required information:
1. Quotation Information
No. Field Description 1 Reference Number * Auto-generated (e.g., QUOT/2026/5). It is recommended not to modify it, as any changes may disrupt the running number sequence. 2 Date Issued * Select quotation date 3 Expiry Date * Set validity period of quotation 4 Salesperson * Select staff responsible (Staff can be added from HRMS – Staffs) 5 Location * Select company location (if applicable) 6 Currency * Default: MYR 7 Exchange Rate * Default: 1 (for MYR) 2. Customer Information
No. Field Description 1 Customer Select existing account. (Account can be added from CRM – Accounts) 2 Add New Customer Add new customer (only if not available) 3. Quotation Details
No. Field Description 1 Subject * Title of the quotation 2 Discount in % Tick if discount is in percentage 3 Unit Price Tax Inclusive Tick if price includes tax 4. Items / Products details
Field Description Qty Quantity of item Unit Unit of measurement (e.g. pax) Custom Product “Custom Product” as the default selection. To use an existing product, manually add it in Pricebook Management under the Pricebook section. Code Item code Name Item name. Auto generated if select pricebook Description Additional item details Unit Price Price per unit Discount Discount can be entered as an amount or a percentage. The percentage field is editable only when the “Discount in Percentage” checkbox is selected. Tax Applicable tax Amount Auto-calculated Add Item User can add more than 1 item 5. Summary Calculation
Field Description Amount Excl Tax Total before tax Discount Total discount Tax Total tax Amount Incl Tax Final total amount 6. Terms and Remarks
Field Description Terms Conditions for the quotation (visible to customer) Remarks Payment or additional notes (visible to customer) 7. Internal Notes
Field Description Internal Notes For internal use only (not visible to customer) 8. Attachments
Field Description Cover Letter Document shown at the front of quotation Extra Documents Supporting documents attached at the back -
Click Submit once completed.
-
⚠️ Important Notes
| No. | Topic | Explanation |
|---|---|---|
| 1 | Customer | Must select an Account to proceed |
| 2 | Auto Calculation | System calculates totals automatically |
| 3 | Terms & Remarks | Will be shown to customer |
| 4 | Internal Notes | Not visible to customer |
| 5 | Attachments | Optional but useful for supporting documents |
Edit Quotation
-
Go to Quotations > View List
-
From the Quotation list, click Edit.
-
Update any required details (items, pricing, dates, etc.).
-
Click Save.
⚠️ Note:
Ensure all information is accurate before finalizing.
View Quotation
-
Go to Quotations > View List
-
Click Details next to the quotation.
-
Review:
-
Customer information
-
Item details
-
Pricing and totals
-
Delete Quotation
-
Go to Quotations > View List
-
Click Delete next to the quotation.
-
Confirm deletion.
⚠️ Important Notes:
| Situation | Explanation |
|---|---|
| Finalized quotation | Cannot be edited unless unfinalized (if allowed) |
| Deletion | Cannot be undone |
| Linked documents | Cannot delete if already used in further transactions |
Finalize Quotation
-
Go to Quotations > View List
-
Click Finalize next to the quotation
✅ Once finalized:
-
The quotation is locked from editing
-
It is ready to be sent to customer
-
User can proceed to generate Order Acceptance before / after finalize regardless