
ONLINE ONBOARDING
Step-by-step tutorials to help you get started with OCLite faster.
Step 1: Global Configuration
Step 2: HRMS
1. HRMS Configurations – Manage Department
2. HRMS Configurations – Manage Designation
3. HRMS Configurations – Manage Job Classifications
4. Staff Management – How to Add New Staff?
5. Staff Management – How to Edit Staff’s Information?
6. Leave Setup – Step 1: Define Leave Types
7. Leave Setup – Step 2: Leave Entitlement Defaults
Step 3: Payroll
Step 4: Accounting
1. Accounting Configurations – Wizards
2. Accounting Configurations – Accounting Period
3. Understanding Chart of Accounts
4. How to Create and Manage Customer (Debtor)
5. How to Create and Manage Invoice
6. How to Create and Manage Receipt (Receive Payment)
7. How to Create and Manage Credit Note
8. How to Create and Manage Debit Note
9. How to Create and Manage Supplier (Creditor)
10. How to Create and Manage Receive Invoice
11. How to Create and Manage Self-Billed Invoice
12. How to Create and Manage Payment (Issue Payment / Payment Voucher)
13. How to Create and Manage Received Credit Note
Step 5: Pricebook
Step 6: CRM
Step 7: POS
Step 8: System Enhancements (Optional)
Global Configuration
1. How Do I Change My Username, Email, or Password?
2. How to Set Reports Template?
4. What Should I Do If I Forgot My Password?
HRMS
1. HRMS Configurations – Manage Approvers
2. Staff Management – Resign, Deactivate, Suspend & Unassign
PAYROLL
1. Manage Adjustments – Adjustment Purposes
2. Manage Adjustments – Add Adjustment Individually
CRM
1. Contact Book Overview (Leads, Accounts and Contacts)
3. Financial Transactions Overview
ACCOUNTING
Step 9: OC Lite Beginner Certification
Complete all onboarding modules to unlock and download your Beginner Digital Certificate.
Staff Management – Resign, Deactivate, Suspend & Unassign
This article explains how to manage staff status in OfficeCentral. It clarifies the difference between Resign, Deactivate, Suspend, and Unassign, and when to use each action.
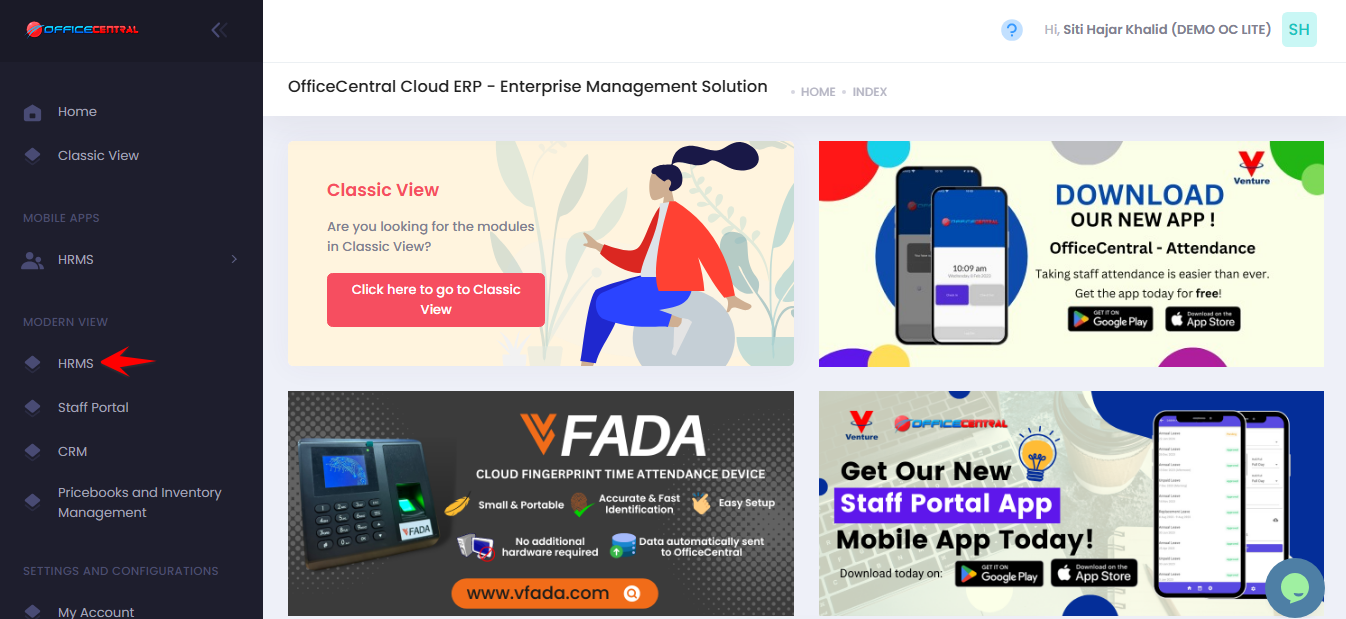
? Where to Access HRMS
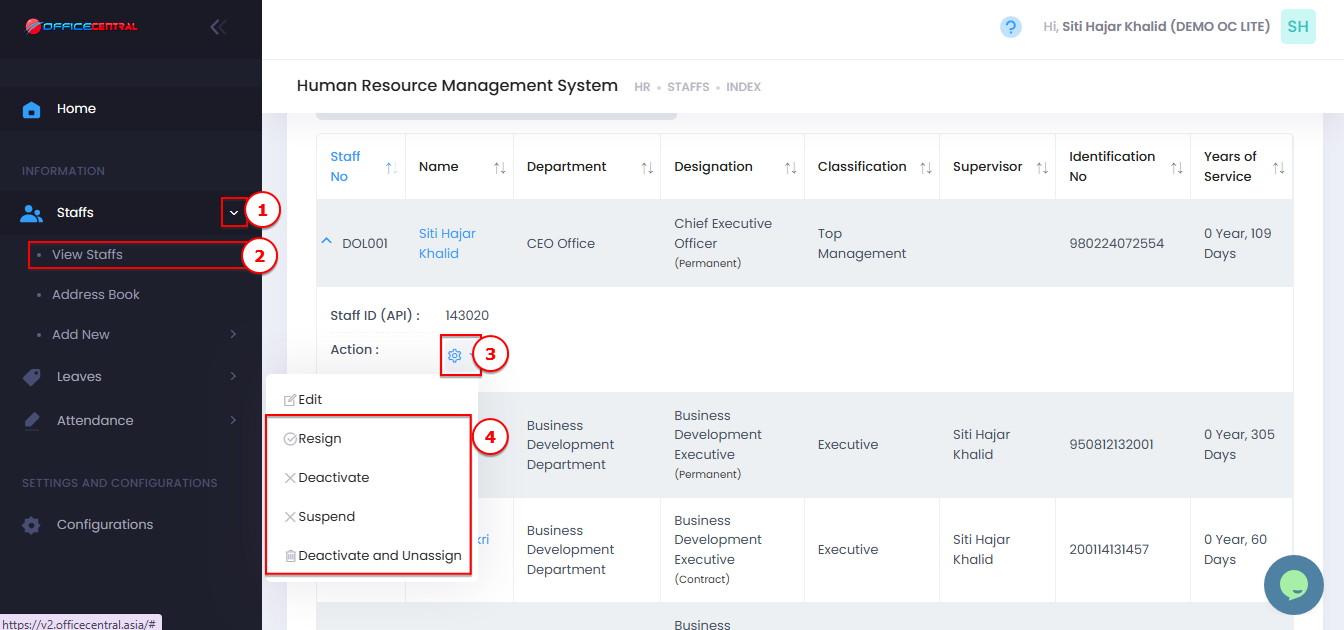
? How to set staff as resign / deactivate / suspend / deactivate & unassign
-
Go to Staff
-
Click View List
-
Search for the staff name
-
Click Action Button
-
Click Resign / Deactivate / Suspend / Deactivate and Unassign
-
Update the necessary information
-
Always click Save or Submit after making any update.
Use the screenshot below to identify the buttons.
? Comparison Table
| Action | When to Use | Staff Visible in List? | Payroll Processing | Can Log In? | Data Deleted? | Reversible? | Notes |
|---|---|---|---|---|---|---|---|
| Resign | Staff leaves company permanently | ✅ Yes (active) | ✅ Yes | ✅ Yes (if have access) | ❌ No | ❌ No | Only used to fill resignation details; no other restrictions applied |
| Deactivate | Hide resigned or inactive staff | ✅ Yes (filtered to inactive) | ❌ No | ✅ Yes (if have access) | ❌ No | ✅ Yes (can reactivate) | Suitable for ex-staff records retention |
| Suspend | Temporary unpaid leave / payroll hold | ✅ Yes (active) | ❌ No | ✅ Yes (if have access) | ❌ No | ✅ Yes (can unsuspend) | Only affects payroll; system access remains if enabled |
| Deactivate & Unassign | Staff should lose system access completely | ✅ Yes (filtered to inactive) | ❌ No | ❌ No | ❌ No | ✅ Yes (can reassign) | Unassign removes all OfficeCentral access regardless of role; to remove partial access, admin should adjust in Global Configuration → Role Groups |