
ONLINE ONBOARDING
Step-by-step tutorials to help you get started with OCLite faster.
Step 1: Global Configuration
Step 2: HRMS
1. HRMS Configurations – Manage Department
2. HRMS Configurations – Manage Designation
3. HRMS Configurations – Manage Job Classifications
4. Staff Management – How to Add New Staff?
5. Staff Management – How to Edit Staff’s Information?
6. Leave Setup – Step 1: Define Leave Types
7. Leave Setup – Step 2: Leave Entitlement Defaults
Step 3: Payroll
Step 4: Accounting
1. Accounting Configurations – Wizards
2. Accounting Configurations – Accounting Period
3. Understanding Chart of Accounts
4. How to Create and Manage Customer (Debtor)
5. How to Create and Manage Invoice
6. How to Create and Manage Receipt (Receive Payment)
7. How to Create and Manage Credit Note
8. How to Create and Manage Debit Note
9. How to Create and Manage Supplier (Creditor)
10. How to Create and Manage Receive Invoice
11. How to Create and Manage Self-Billed Invoice
12. How to Create and Manage Payment (Issue Payment / Payment Voucher)
13. How to Create and Manage Received Credit Note
Step 5: Pricebook
Step 6: CRM
Step 7: POS
Step 8: System Enhancements (Optional)
Global Configuration
1. How Do I Change My Username, Email, or Password?
2. How to Set Reports Template?
4. What Should I Do If I Forgot My Password?
HRMS
1. HRMS Configurations – Manage Approvers
2. Staff Management – Resign, Deactivate, Suspend & Unassign
PAYROLL
1. Manage Adjustments – Adjustment Purposes
2. Manage Adjustments – Add Adjustment Individually
CRM
1. Contact Book Overview (Leads, Accounts and Contacts)
3. Financial Transactions Overview
ACCOUNTING
Step 9: OC Lite Beginner Certification
Complete all onboarding modules to unlock and download your Beginner Digital Certificate.
How to Create and Manage Payment (Issue Payment / Payment Voucher)
This guide explains how to record and manage payments received from customers in OfficeCentral Accounting Module.
Receipts are used to:
-
Record payments made to suppliers
-
Update outstanding suppliers balances
-
Ensure accurate financial and aging reports
Accounting Entry
| Transaction | Debit (Dr) | Credit (Cr) | Remarks |
|---|---|---|---|
| Issue Payment | Creditor | Bank / Cash | Record payment made to supplier |
Where to Access Accounting

How to Create Receipt (Receive Payment)
There are 2 methods to record payment:
| Method | Description |
|---|---|
| Generate from Received / Self-Billed Invoice | Recommended. Automatically links payment to an existing approved invoice |
| Create Directly | Manual creation without linking to any invoice. You must fill in all payment details |
Step 1: Access the Create Function
Option 1: Generate from Received / Self-Billed Invoice (Recommended)
-
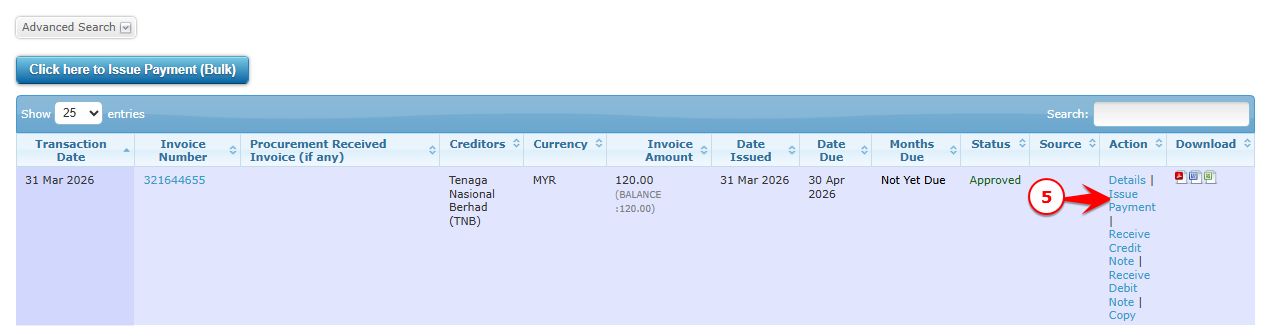
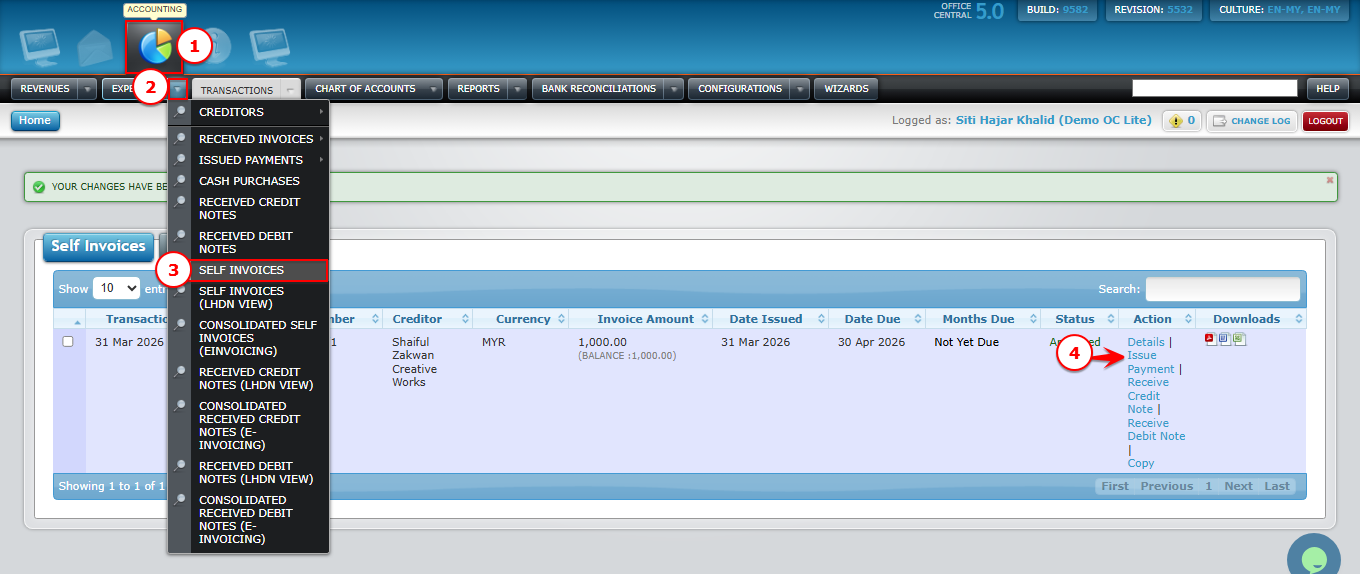
Go to Accounting > Expenses > Received Invoices > Overall OR Accounting > Expenses > Self Invoices
-
Locate the invoice
-
Click Receive Payment
? No need to re-enter details — system will auto-fill based on invoice
Use the screenshot below to locate these buttons.
Generate from Received Invoices

Generate from Self-billed Invoices
Option 2: Create Receipt Manually
-
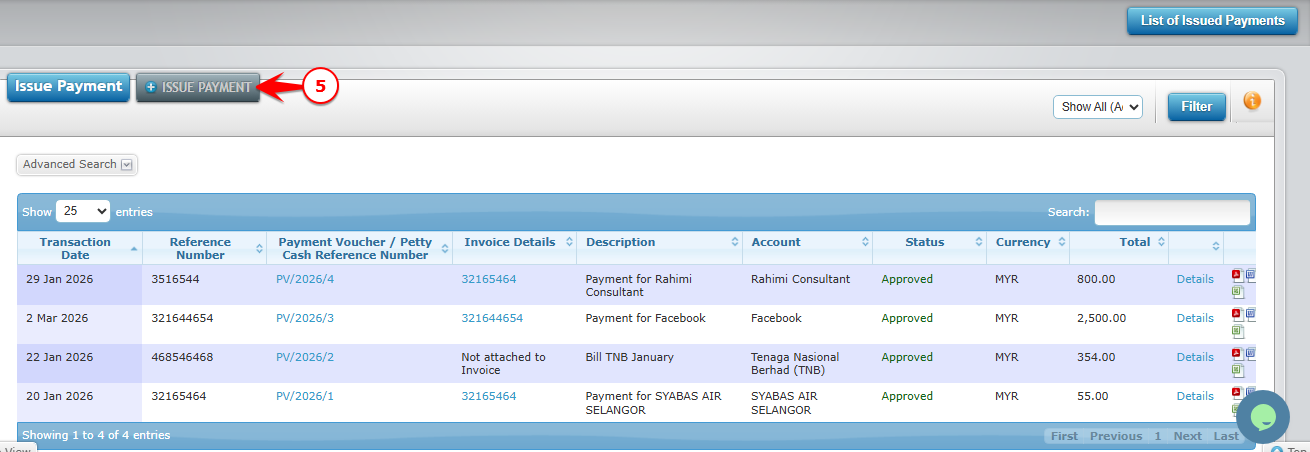
Go to Accounting > Receipts > Overall
-
Click + Receive Payment
Use the screenshot below to locate these buttons.

Step 2: Enter Receipt Information
Basic Information
| Field | Description |
|---|---|
| Reference Number * | Recorded in accordance with the reference number stated on the supplier’s receipt |
| Issued Payment From * | Select existing cash / bank account |
| Issued To * | Select existing supplier or Add New Account (Creditor). To add supplier, please refer 4.1 How to Create and Manage Supplier (Creditor) |
| Location * | Default location (OC Lite: Headquarters). To add location, please refer How do I Manage Locations in OfficeCentral? |
| Date Received * | Receipt creation date |
| Payment Voucher Number | Optional |
| Payment Method | Optional |
| Payment Reference Number / Cheque Number | Optional |
| Currency * | Default currency (OC Lite: MYR). |
| Exchange Rate * | Default 1. Change current rate if applicable |
| Subject | Short description of issued payment. Recommended to follow the subject of the real supplier’s receipt |
Billing & Pricing Settings
| Field | Description |
|---|---|
| Billing Information | Click to view customer billing details |
| Discount in % | Tick if using percentage discount |
| Tax Inclusive | Tick if unit price includes tax |
Item Details
| Field | Description |
|---|---|
| Quantity * | Number of units |
| Measurement * | Example: unit / pax / box |
| Item Code | Product or service code |
| Item Name * | Product or service name |
| Description | Additional item details |
| Unit Price * | Price per unit |
| Discount | Amount or % |
| Tax | Select tax type |
Auto Calculation
System will calculate automatically:
- Amount Excl. Tax
- Discount
- Tax
- Exempted Tax
- Amount Incl. Tax
Step 3: Save Issued Payment
-
Review all details
-
Click Submit
Step 4: Approve / Reject Issued Payment
After saving, receipt must be approved to be valid.
? Go to: 5.0 How to Approve / Reject / Unapprove Transactions
⚠️ Important:
Only approved transactions will appear in accounting reports and supplier aging
If not approved, system will treat the invoice as unpaid
How to Edit Issued Payment
- Go to Accounting > Expenses > Issued Payment > Overall
-
Click Edit next to the Pending issued payment you would like to edit
-
Update the required information
-
Click Submit to save
Accounting Impact (Edit)
| Scenario | Debit (Dr) | Credit (Cr) |
|---|---|---|
| Edit Issue Payment | Creditor (updated) | Bank / Cash (updated) |
⚠️ Note:
Only Pending issued payment can be edited
Approved issued payments are NOT editable
Edited values will NEED user to edit the double entry accordingly (bottom of the page)
⚠️ Important Notes
-
Issued Payments CANNOT be deleted
-
Only Pending issued payment can be edited
-
Only approved transactions appear in accounting reports
-
Incorrect entries ONLY CAN be rejected