
ONLINE ONBOARDING
Step-by-step tutorials to help you get started with OCLite faster.
Step 1: Global Configuration
Step 2: HRMS
1. HRMS Configurations – Manage Department
2. HRMS Configurations – Manage Designation
3. HRMS Configurations – Manage Job Classifications
4. Staff Management – How to Add New Staff?
5. Staff Management – How to Edit Staff’s Information?
6. Leave Setup – Step 1: Define Leave Types
7. Leave Setup – Step 2: Leave Entitlement Defaults
Step 3: Payroll
Step 4: Accounting
1. Accounting Configurations – Wizards
2. Accounting Configurations – Accounting Period
3. Understanding Chart of Accounts
4. How to Create and Manage Customer (Debtor)
5. How to Create and Manage Invoice
6. How to Create and Manage Receipt (Receive Payment)
7. How to Create and Manage Credit Note
8. How to Create and Manage Debit Note
9. How to Create and Manage Supplier (Creditor)
10. How to Create and Manage Receive Invoice
11. How to Create and Manage Self-Billed Invoice
12. How to Create and Manage Payment (Issue Payment / Payment Voucher)
13. How to Create and Manage Received Credit Note
Step 5: Pricebook
Step 6: CRM
Step 7: POS
Step 8: System Enhancements (Optional)
Global Configuration
1. How Do I Change My Username, Email, or Password?
2. How to Set Reports Template?
4. What Should I Do If I Forgot My Password?
HRMS
1. HRMS Configurations – Manage Approvers
2. Staff Management – Resign, Deactivate, Suspend & Unassign
PAYROLL
1. Manage Adjustments – Adjustment Purposes
2. Manage Adjustments – Add Adjustment Individually
CRM
1. Contact Book Overview (Leads, Accounts and Contacts)
3. Financial Transactions Overview
ACCOUNTING
Step 9: OC Lite Beginner Certification
Complete all onboarding modules to unlock and download your Beginner Digital Certificate.
How to Manage Accounts
An Account represents a company / organization / individual (e.g., customer, supplier, partner) and is required to perform financial transactions such as quotations, invoices, and payments.
How Accounts Are Created
Accounts can be created in three ways:
| Method | Explanation | Remarks |
|---|---|---|
| Convert from Lead | Convert a qualified lead into an account | 2.1.2 Convert Lead to Account |
| Create from Debtor / Creditor Module | Account is automatically created when added in accounting modules | |
| Add Directly from Accounts Module | Manually create a new account from Contact Book | 2.2 How to Manage Accounts |
? Where to Access CRM
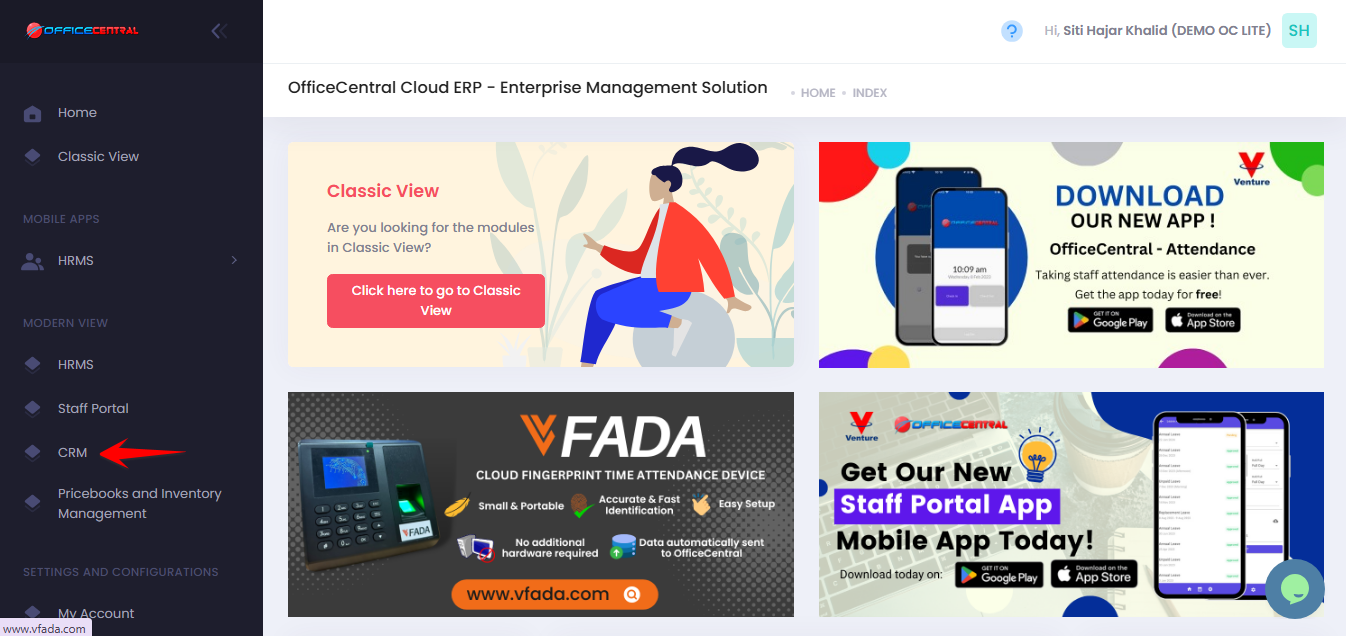
Where to Access This Function
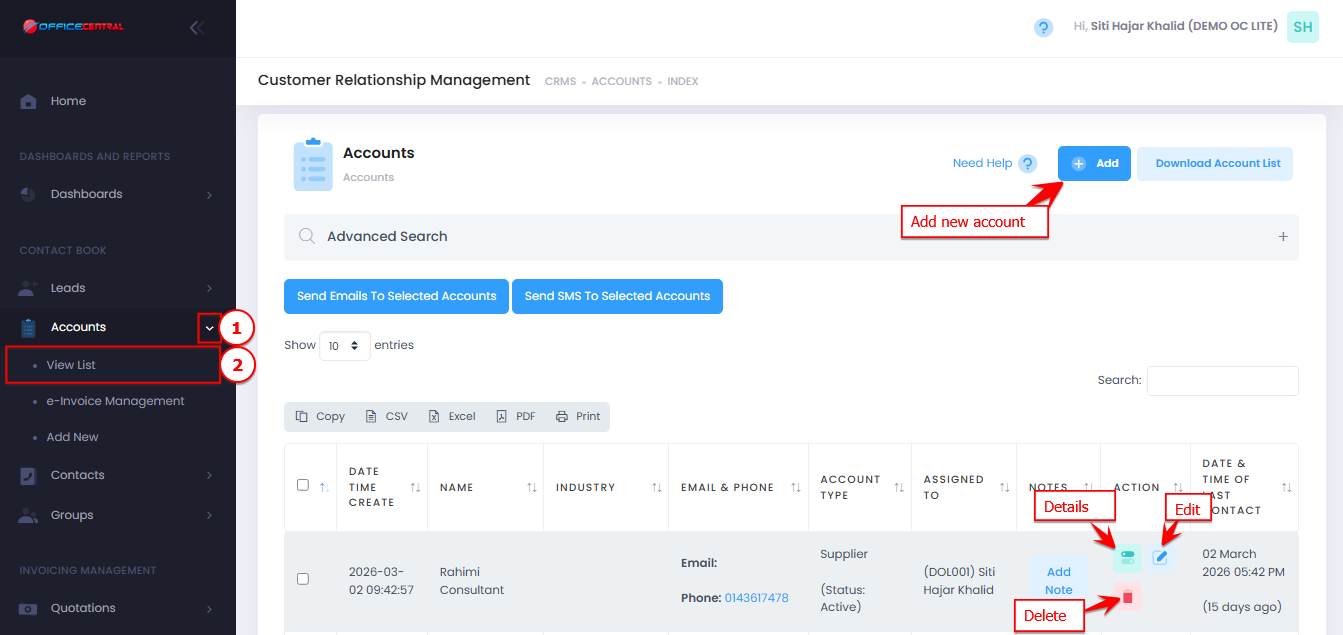
- Go to CRM > Accounts > View List
- On the Accounts View List page, you will see:
| No. | Function | Description |
|---|---|---|
| 1 | Add | Add a new account manually |
| 2 | Details | View full account information |
| 3 | Edit | Update account details |
| 4 | Delete | Remove unused account |
Use the screenshot below to locate these buttons.
How to Add a New Account
-
Go to CRM > Accounts > View List
-
Click Add
- Fill in the required information such as:
1. Account Information
No.FieldDescription / Notes1ImageUpload company logo (Max 5MB)2Account Name *Company/organization/individual name3Identification Number / Registration No *Company registration or identification number4Short CodeUnique short code used for public pages (optional)5TagOptional label or category6Account Type *Select Customer, Supplier, Partner, etc.7Order From AccountOptional reference account for orders8Introducer AccountOptional reference if another account introduced this account9Salesperson *Select staff responsible for the account10Credit Terms (Days) *Default is 30 if left as 011LHDN e-Invoice Registration TypeOptional, for e-invoicing12TIN NumberEnsure no additional space when inserting the TIN number13New Registration Number / NRICFor e-Invoicing; numbers only14MSIC CodeOptional industry classification2. Contacts (PIC) – This will also appear in Contacts > View List
No.FieldDescription1TitleMr, Mrs, Madam, Dato’, etc.2First Name *PIC first name3Last NamePIC last name4PhoneInclude country code (e.g., 60)5MobileInclude country code (optional)6EmailContact email7Add MoreClick to add additional PICs
3. Custom FieldsClick Add More Custom Fields for any additional company-specific information
-
Click Add More Custom Fields to include additional information.
-
Optional, but recommended if your company wants to track extra details such as:
-
Vehicle plate numbers
-
Document reference numbers
-
Any other account-specific info
-
-
4. More Information
| Field | Description |
|---|---|
| Industry | Select from default industry list |
| Number of Employees | Enter total employees |
| Company email (optional) | |
| Phone | Company phone (optional) |
| Fax | Company fax (optional) |
| Website | Company website (optional) |
5. Billing Information
| Field | Description |
|---|---|
| Address Line 1 & 2 | Company billing address |
| Country / State / City / Postcode | Complete address |
6. Shipping Information Same as Billing if shipping is same as billing. Otherwise, fill in shipping address fields
7. Other Addresses
- Optional addresses for different branches
-
Fields: Street, Street 2, City, Postcode, State, Country
8. Bank Information
| Field | Description |
|---|---|
| Payable To | Name on the bank account |
| Bank Name | Select bank |
| Bank Account No | Bank account number |
4. Click Save Form.
How to View Account Details
-
Go to Accounts > View List
-
Click Details.
How to Edit an Account
-
Go to Accounts > View List
-
Click Edit and make any changes
-
Click Save Form
How to Delete an Account
-
Go to Accounts > View List
-
Click Delete
-
Confirm the deletion.
⚠️ Important Notes:
| Situation | Explanation |
|---|---|
| With transactions | Cannot be deleted if used in financial transactions |
| Without usage | Can be deleted if unused |
| Data removal | Deleted data cannot be recovered |
Extra Notes
| Topic | Explanation |
|---|---|
| Financial Transactions | Only accounts can be used for invoicing, quotations, etc. |
| Contacts (PIC) | One account can have multiple contacts |