

A step-by-step guide to operate business better with OCLite
ONLINE ONBOARDING
#OCLITELEVELUP
Global Configuration
How Do I Change My Username, Email, or Password?
How Do I Manage Locations in OfficeCentral?
How to Add, Remove & Replace Users?
How to Manage Company’s Information?
How to Manage Public Holidays?
How to Register and Log In to OfficeCentral?
How to Set User Access in OfficeCentral? (Assign Roles)
How to Manage Company Bank Account?
What Should I Do If I Forgot My Password?
HRMS
1.1 HRMS Configurations – Manage Department
1.2 HRMS Configurations – Manage Designation
1.3 HRMS Configurations – Manage Job Classifications
1.4 HRMS Configurations – Manage Approvers
2.1 Staff Management – How to Add New Staff?
2.2 Staff Management – How to Edit Staff’s Information?
2.3 Staff Management – Resign, Deactivate, Suspend & Unassign
3.1.1 Leave Setup – Step 1: Define Leave Types
3.1.2 Leave Setup – Step 2: Leave Entitlement Defaults
3.1.3 Leave Setup – Step 3: Process Leave Entitlements
3.2.1How to Manage/Approve Leave Application for Staff (HR / Admin)
Payroll
Pricebook
CRM
Accounting
1.0 Accounting Configurations – Wizards
1.1 Accounting Configurations – Accounting Period
1.2 Accounting Configurations – Reference Number
2.0 Understanding Chart of Accounts
3.0 How to Create and Manage Customer (Debtor)
3.1 How to Create and Manage Invoice
3. 2 How to Create and Manage Receipt (Receive Payment)
3.3 How to Create and Manage Credit Note
3.4 How to Create and Manage Debit Note
4.0 How to Create and Manage Supplier (Creditor)
4.1 How to Create and Manage Receive Invoice
4.2 How to Create and Manage Self-Billed Invoice
4.3 How to Create and Manage Payment (Issue Payment / Payment Voucher)
4.4 How to Create and Manage Received Credit Note
Understanding Chart of Accounts
The Chart of Accounts (COA) is the backbone of your accounting system. It organizes all your accounts for accurate financial reporting.
In OfficeCentral, the COA allows you to:
-
Categorize financial transactions
-
Produce financial statements (Profit & Loss, Balance Sheet)
-
Map transactions to the correct account for reporting
⚠️ Important: In OfficeCentral, all transactions are mapped only to Detail accounts, not Header accounts.
? Where to Access Accounting


Where to Access This Function
-
Go to Accounting > Chart of Accounts
-
Click on Chart of Accounts

Here, you will see a set of Chart of Accounts depends on Chart of Account structure that you’ve selected in 1.0 Accounting Configurations – Wizards
Example Chart of Account format: OfficeCentral Default (MY)
Example Chart of Account format: Financial Report Standard Default (MY)

Understanding Header vs Detail
| Type | Purpose | Notes |
|---|---|---|
| Header Account | Acts as a group or category for multiple detail accounts | Cannot be used to record transactions directly |
| Detail Account | Actual account where transactions are recorded | All invoices, receipts, journal entries, etc., must map to detail accounts |
How to Identify Header vs Detail
? Insert screenshot showing selected account and right-side panel
Steps
- Click on any account in the Chart of Accounts list
- Look at the right-side panel
- Check the
How to Add Header Account
- Go to Chart of Accounts > Chart of Accounts
- Click + Add Header
- Make sure the Account Type: Header
- Fill in the details:
| No. | Field | Description |
|---|---|---|
| 1 | Account Name * | Name of the header (e.g., Assets, Expenses) |
| 2 | Account Code * | Auto-generated (can customize if needed) |
| 3 | Location * | Select applicable location |
| 4 | What is this Account? * | Select applicable account |
- Click Submit
Please refer screenshot below to locate the buttons

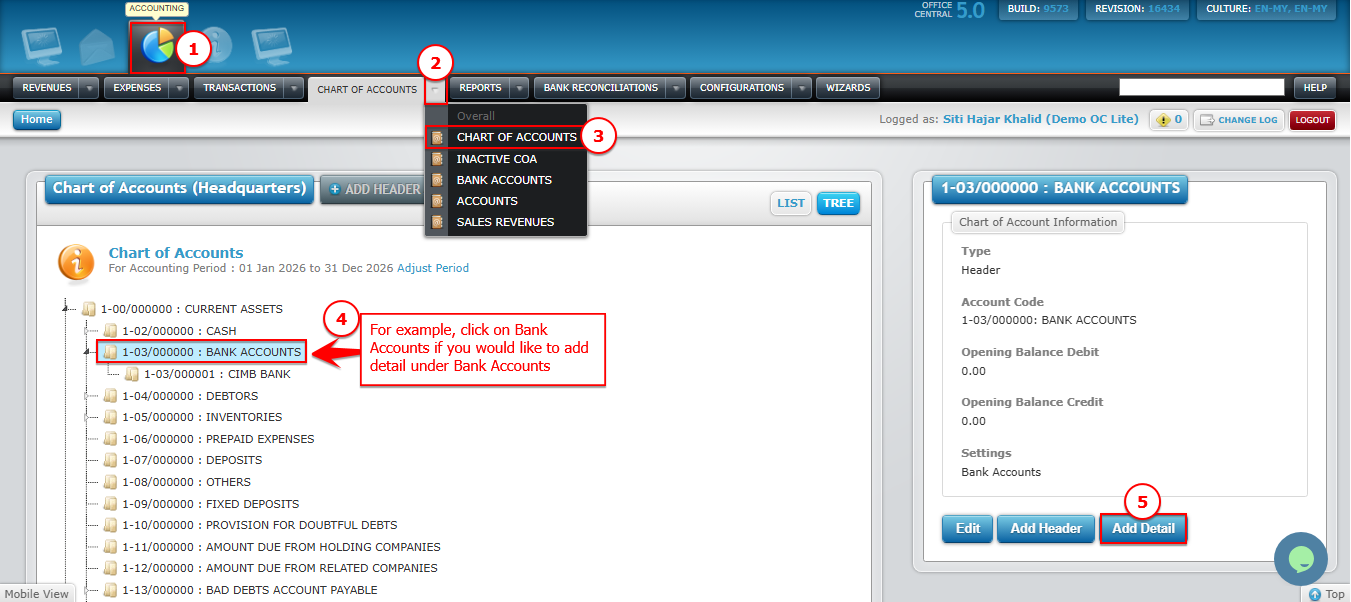
How to Add Detail Account
- Go to Chart of Accounts > Chart of Accounts
- Click on Header you would like to add the Detail
- Click on Add Detail under Chart of Account Information
- Make sure the Account Type: Detail
- Fill in the details:
No. Field Description 1 Account Name * Name of the header (e.g., Assets, Expenses) 2 Account Code * Auto-generated (can customize if needed) 3 Location * Select applicable location 4 What is this Account? * Select applicable account - Click Submit
Please refer screenshot below to locate the buttons
Example Structure
Header: Current Assets
-
Detail: Cash
-
Detail: Bank Accounts
Header: Current Liabilities
-
Detail: Creditors
-
Detail: Wages Payables
This structure helps keep your COA organized and financial reports accurate.