
ONLINE ONBOARDING
A step-by-step guide to operate business better with OCLite
Step 1: Global Configuration
Step 2: HRMS
1. HRMS Configurations – Manage Department
2. HRMS Configurations – Manage Designation
3. HRMS Configurations – Manage Job Classifications
4. Staff Management – How to Add New Staff?
5. Staff Management – How to Edit Staff’s Information?
6. Leave Setup – Step 1: Define Leave Types
7. Leave Setup – Step 2: Leave Entitlement Defaults
Step 3: Payroll
Step 4: Accounting
1. Accounting Configurations – Wizards
2. Accounting Configurations – Accounting Period
3. Understanding Chart of Accounts
4. How to Create and Manage Customer (Debtor)
5. How to Create and Manage Invoice
6. How to Create and Manage Receipt (Receive Payment)
7. How to Create and Manage Credit Note
8. How to Create and Manage Debit Note
9. How to Create and Manage Supplier (Creditor)
10. How to Create and Manage Receive Invoice
11. How to Create and Manage Self-Billed Invoice
12. How to Create and Manage Payment (Issue Payment / Payment Voucher)
13. How to Create and Manage Received Credit Note
Step 5: Pricebook
Step 6: CRM
Step 7: POS
Step 8: System Enhancements (Optional)
Global Configuration
1. How Do I Change My Username, Email, or Password?
2. How to Set Reports Template?
4. What Should I Do If I Forgot My Password?
HRMS
1. HRMS Configurations – Manage Approvers
2. Staff Management – Resign, Deactivate, Suspend & Unassign
PAYROLL
1. Manage Adjustments – Adjustment Purposes
2. Manage Adjustments – Add Adjustment Individually
CRM
1. Contact Book Overview (Leads, Accounts and Contacts)
3. Financial Transactions Overview
ACCOUNTING
Step 9: OC Lite Beginner Certification
Complete all onboarding modules to unlock and download your Beginner Digital Certificate.
Pricebook Management – Add Product / Item / Service Details
To add detailed information for a new product, item, or service into your company’s pricebook so it can be used for sales, invoicing, and inventory management.
? Where to Access Pricebooks and Inventory Management
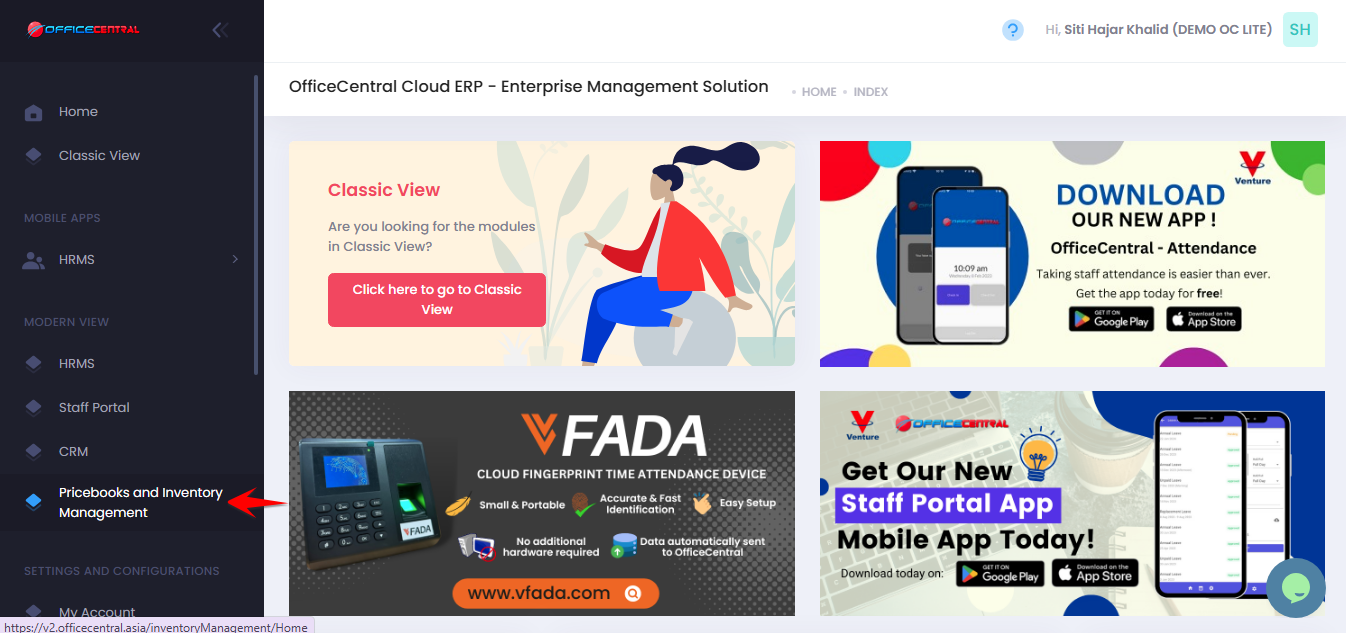
? Where to Access This Function
-
Go to Pricebook Management
-
Click View List
-
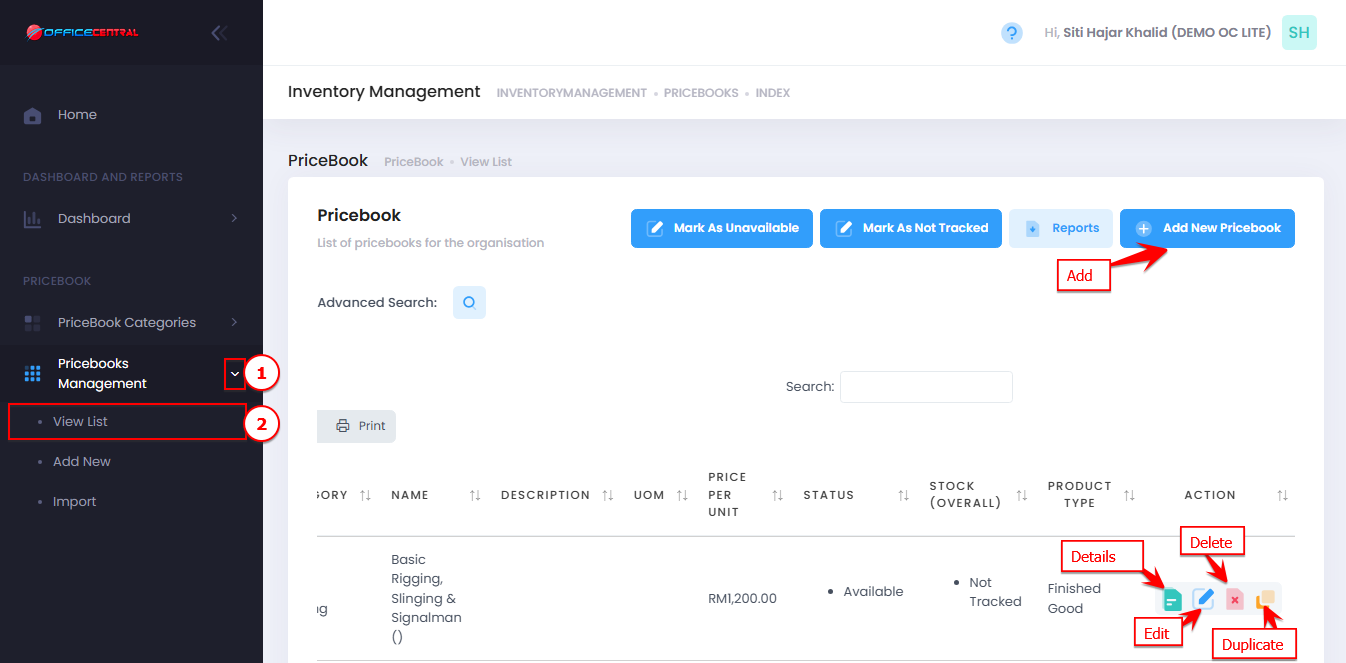
Here you can see all existing categories and access the following buttons:
| No | Button | Function |
|---|---|---|
| 1 | Add New Pricebook | Add a new product / item / service |
| 2 | Details | View pricebook’s details |
| 3 | Edit | Modify details of an existing pricebook |
| 4 | Delete | Remove an unused pricebook |
| 5 | Duplicate | Create a copy of an existing product’s details, including price. Useful for products with many variations sold at the same price. |
Use screenshot below to locate the buttons
1️⃣ Add New Pricebook / Product / Item / Service
After clicking Add New, you will see multiple tabs: Detail, Pricing, Accounting with Pricebook, Other, and Add More Pictures.
1. Detail Tab
| Field | Description / Notes |
|---|---|
| Image | Upload product image. Max 500 kB. Recommended <100 kB for faster load on eStore and POS. |
| Code* | Unique product code |
| Product Name* | Name of product |
| Inventory Barcode | Optional barcode for inventory tracking |
| Minimum Order | Minimum quantity per order |
| Description | Product description |
| Remarks | Optional notes |
| Product Type* | Choose Finished Good / Raw Material only |
| Royalty Percentage | If applicable |
| Available for Purchase | Tick if product can be sold in both CRM and POS |
| Stock Tracking | Tick to track inventory. You can see inventory transactions if you subscribe Pricebook package |
| Category* | Select the category (required) |
| Principal | Product principal |
| Mark as Favourite | Optional, for internal reference |
| This is a package | Tick if product consists of other pricebook items |
| Group | Optional grouping for reports |
| Is third-party Product | Tick if sold by a third party |
| Mark as For Invoicing | Tick if product will appear in invoices |
2. Pricing Tab
| Field | Description / Notes |
|---|---|
| Quantity | First input for stock |
| Cost per Unit | Enter cost per unit |
| Unit | e.g., Each, Cm, Box |
| Tax Purchase | Select tax applicable |
| MSIC Code | Optional industrial classification code |
| Pricebook Point Class | Optional point program classification |
| Tax Supply | Select tax applicable |
| Service / Goods Category | Select applicable category |
| Pricing for Account Type | Set price per account type in respective currency |
| Price Per Unit | Base price for customers |
| Back Margin Amount Per Unit | Optional margin adjustment (only for Network Management Module) |
3. Accounting with Pricebook Tab
| Field | Description / Notes |
|---|---|
| Item | Select pricebook that connect to newly created pricebook |
| Discount Percentage | Input discount in percentage (if applicable) |
| Discount Amount | Input discount amount (if applicable) |
| Price per unit | Input selling price per unit |
| Min Purchase Amount | if applicable |
| Min Purchase Quantity | if applicable |
Tip: You can map multiple pricebooks for the same product to manage combos or packages efficiently.
4. Others Tab
| Field | Description / Notes |
|---|---|
| Value | Optional |
| Cash / Credit | Optional |
| Invoice Quantity | Optional |
| Overdue | Optional |
| Weight | Product weight (kg) – for shipping calculations |
| Volumetric Weight | Product dimensions (cm) – for shipping calculations |
| Width / Length / Height | Product dimensions (cm) |
| Calculation Type | For stock tracking (only for Inventory Management module) |
5. Add More Pictures Tab
Upload additional images for the product to improve eStore and POS presentation.
Important Notes:
Fields marked with * are mandatory.
Use recommended image sizes to optimize loading speed.
For products with inventory tracking, ensure Stock Tracking is enabled.
If using fully automated accounting, leave Chart of Account unselected; the system will automatically create and map accounts.
2️⃣ View Pricebook / Product / Item / Service Details
This function allows you to view complete information of a product, item, or service.
Steps
-
Go to Pricebook Management
-
Click View List
-
Click Details on the product you want to view.
-
The system will display the product information such as:
-
Product details
-
Pricing information
-
PAR level
-
Stock report
-
This is useful when you need to review product information without making any changes.
3️⃣ Edit Pricebook / Product / Item / Service
This function allows you to update existing product information.
Steps
-
Go to Pricebook Management
-
Click View List
-
Click Edit on the pricebook you want to modify.
-
Update the necessary information.
-
Click Save to apply the changes.
⚠️ Important Note
Make sure the updated information is correct before saving, as it may affect sales transactions, inventory tracking, and reports.
4️⃣ Delete Pricebook / Product / Item / Service
This function allows you to remove an unused product, item, or service from the pricebook.
Steps
-
Go to Pricebook
-
Click View List
-
Click Delete on the pricebook you want to remove.
-
Confirm the deletion.
⚠️ Important Notes
-
Products that have been used in transactions or inventory records may not be deleted.
-
Deleted records cannot be recovered.
5️⃣ Duplicate Pricebook / Product / Item / Service
The Duplicate function allows you to copy an existing product’s details including pricing. This is useful when you have multiple product variations that share the same information or price.
Steps
-
Go to Pricebook
-
Click View List
-
Click Duplicate on the pricebook you want to copy.
-
The system will create a new pricebook with the same details.
-
Update the necessary fields such as:
-
Product name
-
Code
-
Barcode
-
Category (if needed)
-
-
Click Save.
? Tip:
Use Duplicate to quickly create product variations such as different colors, sizes, or packaging that share the same pricing structure.