
ONLINE ONBOARDING
Step-by-step tutorials to help you get started with OCLite faster.
Step 1: Global Configuration
Step 2: HRMS
1. HRMS Configurations – Manage Department
2. HRMS Configurations – Manage Designation
3. HRMS Configurations – Manage Job Classifications
4. Staff Management – How to Add New Staff?
5. Staff Management – How to Edit Staff’s Information?
6. Leave Setup – Step 1: Define Leave Types
7. Leave Setup – Step 2: Leave Entitlement Defaults
Step 3: Payroll
Step 4: Accounting
1. Accounting Configurations – Wizards
2. Accounting Configurations – Accounting Period
3. Understanding Chart of Accounts
4. How to Create and Manage Customer (Debtor)
5. How to Create and Manage Invoice
6. How to Create and Manage Receipt (Receive Payment)
7. How to Create and Manage Credit Note
8. How to Create and Manage Debit Note
9. How to Create and Manage Supplier (Creditor)
10. How to Create and Manage Receive Invoice
11. How to Create and Manage Self-Billed Invoice
12. How to Create and Manage Payment (Issue Payment / Payment Voucher)
13. How to Create and Manage Received Credit Note
Step 5: Pricebook
Step 6: CRM
Step 7: POS
Step 8: System Enhancements (Optional)
Global Configuration
1. How Do I Change My Username, Email, or Password?
2. How to Set Reports Template?
4. What Should I Do If I Forgot My Password?
HRMS
1. HRMS Configurations – Manage Approvers
2. Staff Management – Resign, Deactivate, Suspend & Unassign
PAYROLL
1. Manage Adjustments – Adjustment Purposes
2. Manage Adjustments – Add Adjustment Individually
CRM
1. Contact Book Overview (Leads, Accounts and Contacts)
3. Financial Transactions Overview
ACCOUNTING
Step 9: OC Lite Beginner Certification
Complete all onboarding modules to unlock and download your Beginner Digital Certificate.
Manage Adjustments – Add Adjustment (Individually)
? Where to Access Payroll
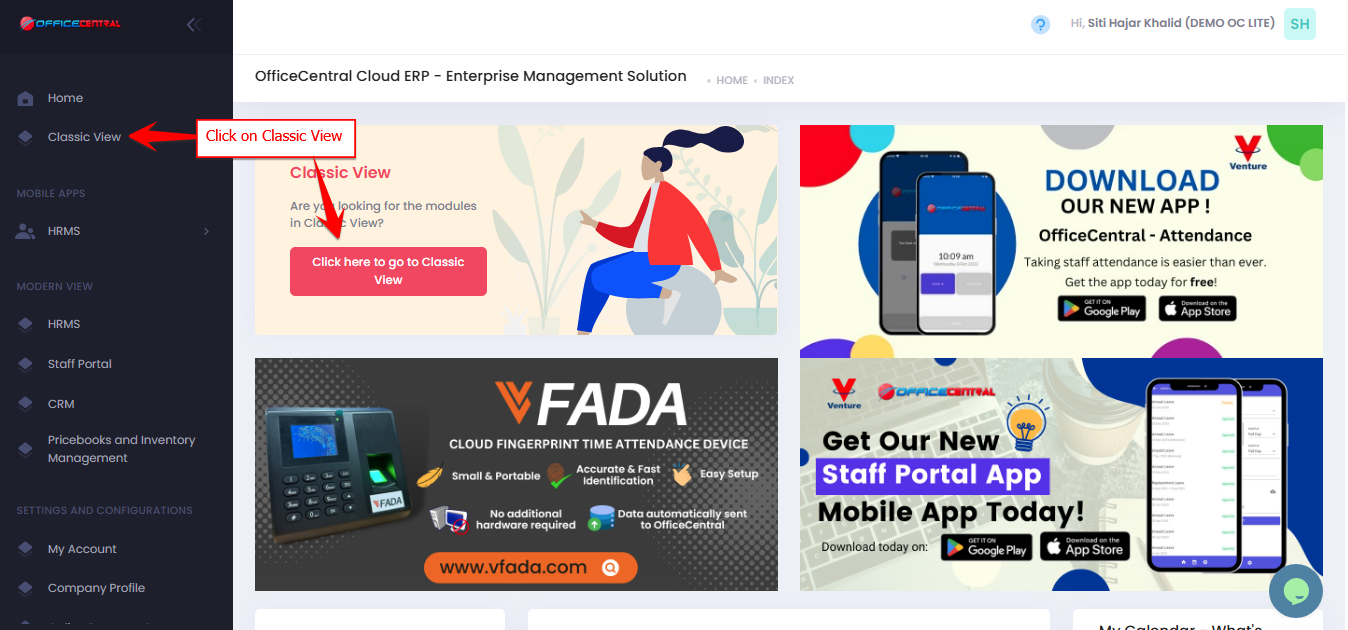

1️⃣ How to Add Adjustment (Additional Earnings / Deductions)
-
Go to Payroll > Adjustments > Add New
-
You will see a form to add adjustment for A STAFF

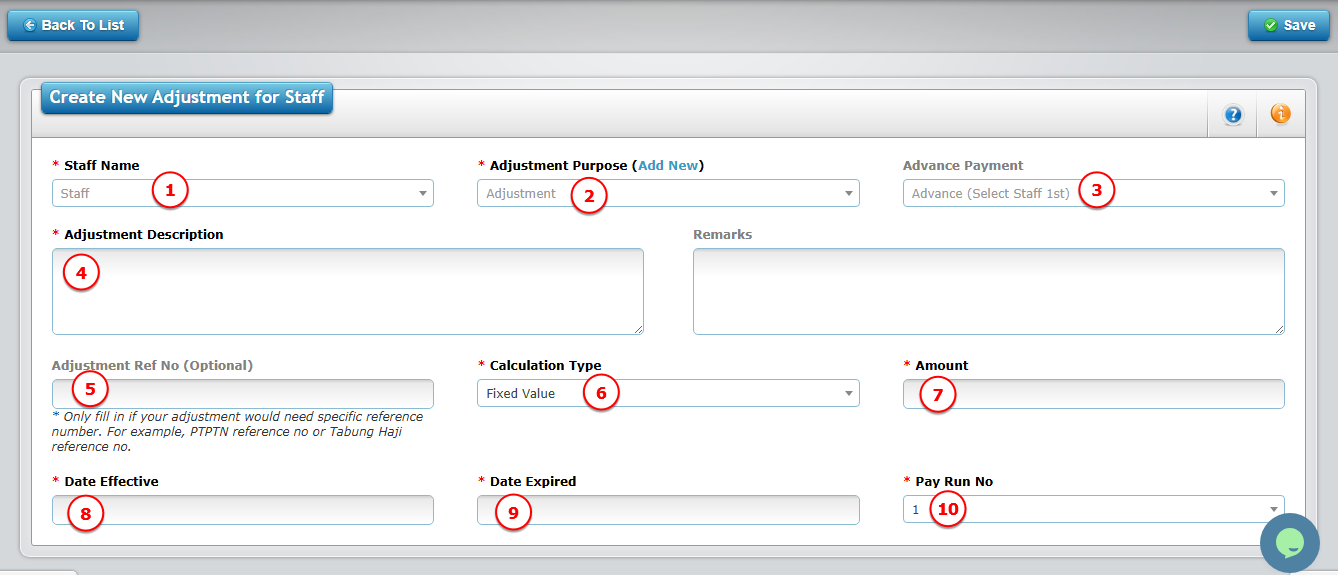
Please refer to the explanation below to help you complete the fields correctly.
? Field Explanation
| No. | Field | What to Do | Example / Explanation |
|---|---|---|---|
| 1 | Staff Name | Select the staff name | Choose the employee you want to apply the adjustment to |
| 2 | Adjustment Purpose | Choose the adjustment purpose | If you would like to see the details/add new adjustment purpose, please refer Step 3a |
| 3 | Advance Payment | Select advance payment |
Select this only if the staff has already received an advance and you are paying the remaining balance.
? Advance payment must be recorded in the Finance Module first. |
| 4 | Adjustment Description | Enter short description | Example: Travel claim for site visit |
| 5 | Adjustment Ref No | Enter reference if applicable | Example: PTPTN / Tabung Haji reference no |
| 6 | Calculation Type | Choose how the amount is calculated | See explanation below |
| 7 | Amount / Percentage | Enter amount / percentage based on selected calculation type | Depends on selection in No. 6 |
| 8 | Effective Date | Select start date | System starts calculation from this date |
| 9 | Expiry Date | Select end date (if any) | System stops automatically after this date |
| 10 | Pay Run No. | Select salary payment cycle |
Select which payroll cycle this adjustment should be applied to.
|
? Explanation of Calculation Type (Field No. 6)
Choose how the allowance/deduction should be calculated:
| Calculation Type | When to Use | Example |
|---|---|---|
| Fixed Value | Amount is always the same every month | RM100 allowance → Enter 100 |
| Based on Salary Calculation Formula | Adjustment follows salary formula (e.g., unpaid leave deduction affects it) | If salary is reduced due to unpaid leave, this amount reduces too |
| Percentage of Basic Salary | Calculated based on basic salary % | 10% of RM2,000 → System calculates RM200 |
| Percentage of Gross Salary | Calculated based on gross salary % | 10% of RM1,850 gross → System calculates RM185 |
? How to Fill the Amount (Field No. 7)
Enter value depending on your selection:
-
Fixed Value → Enter actual amount (e.g., 100)
-
Based on Salary Formula → Enter base amount, system applies salary formula
-
% of Basic Salary → Enter percentage only (e.g., 10 for 10%)
-
% of Gross Salary → Enter percentage only (e.g., 10 for 10%)
⚠ Make sure to never put negative value. If adjustment is deduction, please refer Step 3a: Manage Adjustments – Adjustment Purposes
? Effective & Expiry Date
-
Effective Date → System starts calculating from this date.
-
Expiry Date → System automatically stops after this date.
✅ No need to manually deactivate once expired.If adjustment is temporary, always set an expiry date to avoid overpayment.